 Pinterest
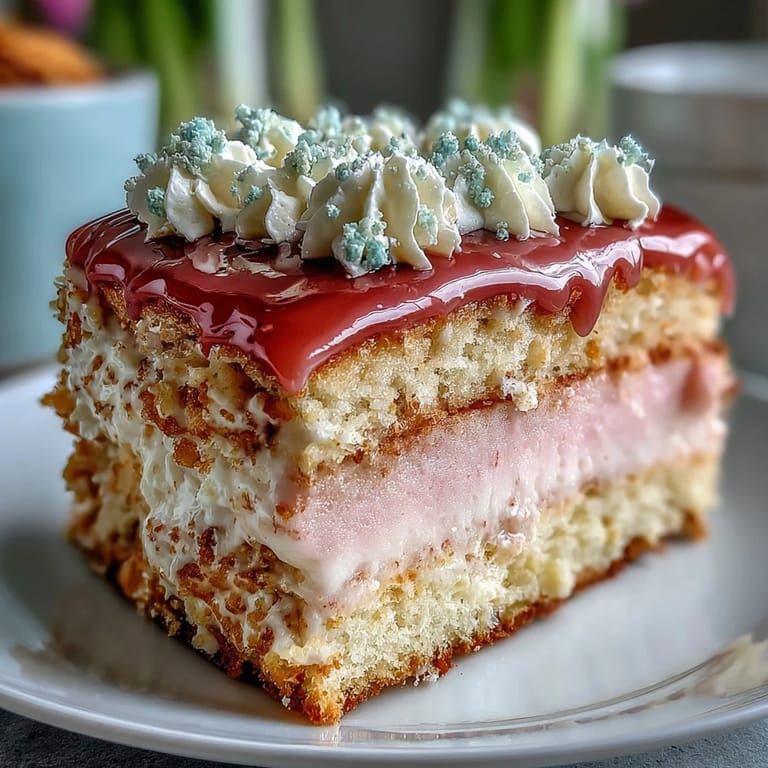
 My sister called me three days before her garden party in a panic—she needed something that looked like spring itself on a plate. I'd never attempted an ombre cake before, but there was something about the challenge that felt right, like the kitchen was asking me to try something I didn't know I could do. That afternoon, I stood in front of three bowls of pale batter, watching the pink and yellow gel swirl in like watercolor, and suddenly everything clicked into place. What emerged from the oven were three delicate layers that looked like they belonged in a dream, and when I stacked them with that silky buttercream, blending the colors up the sides, I understood why people fuss over these things.
I still think about how my sister's guests kept circling back to the dessert table, not because they were still hungry but because they couldn't stop admiring it. One elderly neighbor actually sat with her slice for a full ten minutes, just looking at the layers before taking a bite. That's when I realized this cake isn't just about flavor—it's about creating a moment where people feel like they're tasting something made with intention.
Ingredients
- All-purpose flour (3 cups): The foundation of a tender crumb, so measure by spooning and leveling, never scooping straight from the bag.
- Baking powder (2½ tsp): Ensures an even, delicate rise across all three colored layers without any dense spots.
- Salt (½ tsp): A small pinch that wakes up the sweetness and makes the vanilla sing louder.
- Unsalted butter (1 cup room temperature): Room temperature is non-negotiable here—cold butter won't cream properly and you'll lose that airy texture that makes this cake special.
- Granulated sugar (2 cups): Beat it with the butter until it looks like wet sand, which usually takes about 3-4 minutes and sounds better than any timer.
- Eggs (4 large, room temperature): Cold eggs seize up when they meet warm butter, so pull them out of the fridge while you're prepping everything else.
- Pure vanilla extract (1 tbsp): Don't skimp on quality here—imitation fades in baking, and you want that subtle warmth to come through.
- Whole milk (1 cup, room temperature): The warmth helps everything emulsify, creating a silky batter that bakes evenly.
- Gel food coloring (pink and yellow): Gel is superior to liquid because it won't water down your batter or throw off the ratios.
- Unsalted butter for frosting (1½ cups, room temperature): This is where the buttercream's flavor lives—use good butter and let it soften completely.
- Powdered sugar (5 cups, sifted): Sifting removes lumps that could create grittiness in your otherwise silky frosting.
- Milk or heavy cream (3-4 tbsp): Adjust based on humidity and how thick your frosting naturally turns out—I always start with less and add more if needed.
Tired of Takeout? 🥡
Get 10 meals you can make faster than delivery arrives. Seriously.
One email. No spam. Unsubscribe anytime.
Instructions
- Prepare your mise en place:
- Preheat your oven to 350°F and line three 8-inch pans with parchment paper—this small act prevents the panic of stuck cakes later. Setting everything out beforehand means you're free to focus on the actually important moments like beating butter until it's cloud-like.
- Combine your dry ingredients:
- Whisk flour, baking powder, and salt together in a bowl, which aerates the flour and distributes the leavening evenly. This takes maybe two minutes and makes a real difference in how uniformly your layers rise.
- Cream butter and sugar:
- Beat them on medium speed for 3-4 minutes until the mixture is pale and fluffy, almost like mousse—you'll know it's ready when it lightens in color and increases in volume. This step is where air gets trapped, and that air is what makes the cake tender rather than dense.
- Add eggs thoughtfully:
- Add one egg at a time, beating well after each addition, which prevents the batter from looking curdled or broken. Then mix in the vanilla extract, which dissolves into the batter almost immediately.
- Alternate your wet and dry:
- Add the flour mixture and milk in three additions, starting and ending with flour, mixing just until combined—overmixing develops gluten and toughens the cake. Think of it as a gentle folding motion rather than vigorous beating.
- Divide and tint your batter:
- Split the batter evenly into three bowls and add a small amount of gel coloring to each—start with just a toothpick dab of pink to one bowl and yellow to another, leaving the third plain or creating a soft peach. You can always add more color, but you can't take it out.
- Pour and bake:
- Distribute the three colored batters into your prepared pans and smooth the tops gently—they should bake for 22-26 minutes until a toothpick inserted in the center comes out clean or with just a few moist crumbs. The kitchen will smell like vanilla and butter, warm and inviting, and that's when you know it's almost ready.
- Cool properly:
- Let the cakes rest in their pans for 10 minutes, then turn them out onto wire racks to cool completely—rushing this step can cause your layers to crack or tear. While they cool, you have time to tidy up or have a quiet moment with coffee.
- Make your buttercream:
- Beat room temperature butter on medium-high speed until it's creamy and pale, then gradually add sifted powdered sugar, vanilla, salt, and milk, beating until fluffy and light. If it looks too thick, add more milk a tablespoon at a time until it spreads like a dream.
- Tint the frosting:
- Divide the buttercream into three bowls and tint them to match your layers—a pale pink, pale yellow, and plain. The colors should whisper, not shout, for that sophisticated ombre effect.
- Level and assemble:
- If your layers domed slightly during baking, trim them level with a serrated knife or cake leveler for even stacking. Place the yellow layer on your serving plate, spread it with yellow frosting, top with the peach or plain layer, frost that with plain frosting, then crown it with the pink layer and frost with pink buttercream.
- Create the ombre magic:
- Use your remaining frosting to blend the sides from yellow at the bottom to pink at the top, working in sections and using an offset spatula or cake scraper to create that gradient. This is where patience pays off—smooth strokes and a steady hand create that Instagram-worthy effect.
- Decorate and chill:
- Add pastel sprinkles, edible flowers, or fresh berries if desired, then refrigerate the finished cake for at least 30 minutes before slicing. Chilling helps the layers set so you get clean, beautiful cuts that showcase all your work.
 Pinterest
 That garden party was the first time I understood that baking isn't just about feeding people—it's about creating an experience they'll remember. My sister still has a photo of that cake on her phone, and whenever she shows it to someone new, she tells them I made it, and there's this little pride in her voice that makes me want to bake it again and again. It's become the cake I reach for when I need to celebrate something quietly beautiful.
Understanding the Ombre Effect
The ombre technique might seem like pure artistry, but it's actually quite forgiving once you understand what you're doing. The key is thinking in three distinct shades rather than trying to create a perfect gradient—let the frosting itself do the blending as you work the spatula around the cake. I learned this the hard way on my first attempt when I got so focused on making it perfect that I overworked it and turned everything muddy, but the second time around, treating it more casually and letting the different shades naturally merge created something far more beautiful.
Flavor Variations That Work
While the classic vanilla is stunning on its own, I've started experimenting with gentle flavor shifts that respect the delicate spring aesthetic. A touch of almond extract added to the vanilla, or even a whisper of lemon zest in the batter, plays beautifully with the pastel colors without overwhelming them. You could also try substituting half the milk with buttermilk for a slightly tangier crumb that cuts through the sweetness of the buttercream—I did this once and it became my preferred version, though I still make both depending on the occasion.
Storage and Serving Wisdom
This cake is forgiving when it comes to timing, which is lovely for anyone who isn't a last-minute baker like I am. You can assemble everything the morning of an event, and the cake actually benefits from sitting in the fridge for a few hours as the frosting sets and the layers meld together slightly. Room temperature storage works for a day, but refrigeration keeps everything fresh and stable for up to four days, and honestly, I've found that a slice straight from the fridge has a firmer texture that makes it even easier to plate beautifully.
- Slice with a hot knife for the cleanest cuts—either dip a sharp knife in hot water or run it briefly under hot tap water between each cut.
- If you're making this ahead, freeze the unfrosted layers for up to two weeks, then thaw and decorate on the day you need it.
- Pair it with something light like Moscato or sparkling lemonade to let the delicate cake shine without heavy competition.
 Pinterest
 Every time I make this cake, I'm reminded that the most satisfying part of baking isn't the technical precision—it's watching someone's face light up when they see it, and then taste that tender crumb and silky frosting. This cake has become my answer to so many occasions, and I hope it becomes yours too.
Recipe FAQs
- → How do I achieve the pastel ombre effect?
Divide the batter into three portions and tint each with pink, yellow, or leave plain. After baking, frost each layer with matching tinted buttercream and blend frosting on the sides for the gradient.
- → Can I use natural food colorings instead of gel?
Natural colorings can be used, but they may produce less vivid pastel shades compared to gel food coloring.
- → What’s the best way to level the cake layers?
Use a serrated knife or cake leveler to trim any domed tops for even stacking and frosting application.
- → How should the cake be stored after assembly?
Keep the cake covered at room temperature for up to one day or refrigerate for up to four days to maintain freshness.
- → What can I serve alongside this dessert?
This layered cake pairs beautifully with Moscato wine or refreshing sparkling lemonade to complement its sweet, buttery flavors.